Twitter Bot With Python
Twitter Bot With Python

So, with some extra time on my hands I wanted to add some automation to my posts. Sure, there are a TON of Twitter bots out there. Some you can pay for others you can pull from GitHub. If you are wondering why? Well, it’s an exercise in writing some Python. That in itself should be the only reason. Why Python? Well, it’s light weight. This app doesn’t need to be fast. I am not looking at performance. At the end of the day it is a batch process.
End goal is to have a small Python app that posts a tweet on a schedule. What we want to make sure we don’t build is a spam bot. That is what I am trying to completely avoid in the building of this app. This gives some automation to my posting. I don’t have to worry if I forgot to post about my new blog post or not. I have AWS CodeBuild running on a schedule. Why not have Twitter run on one for me as well?
Workflow
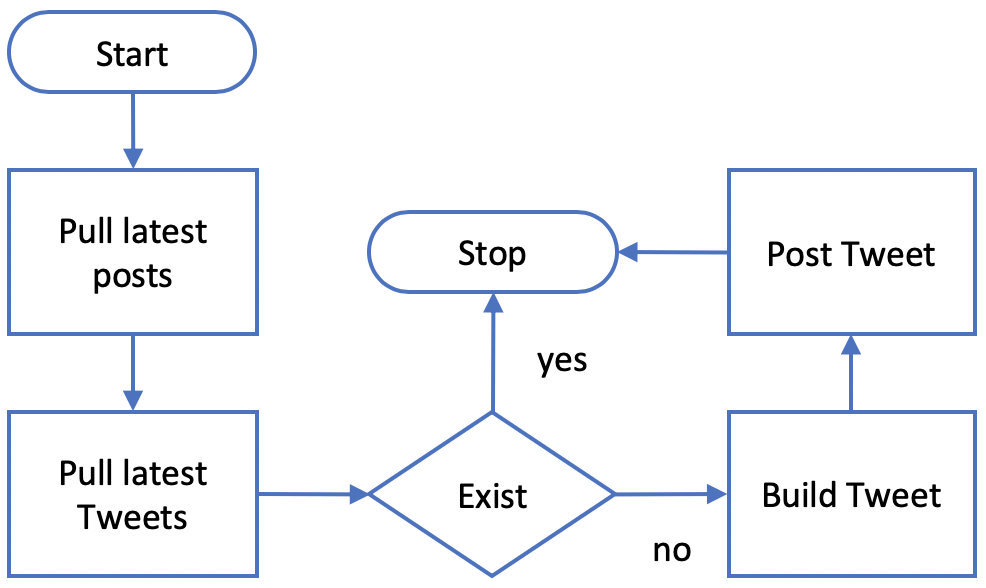
With any app we need to figure out the workflow. Sure, we start coding but a quick outline on what we want to do won’t take long. We won’t worry about what kicks this off. That is outside the scope of this project. We can make this a cron job or have something external kick this off. But let’s think about this, what if it runs more than once? That would give me a duplicate Tweets and we are spamming.
Here are our proposed steps:
- Start
- Pull the latest post
- Pull the latest Tweets
- Compare
- Build Tweet
- Post Tweet
If we diagram that out we have this below:
Next is the Twitter API. First to do this you will need to have a Twitter account; you can sign up here. Then you will need to go over and agree to all the stuff Twitter needs from you here. This is the developer site of Twitter.
Once you logged in and signed your soul away to Twitter and promised not to be a Russian Bot. You can then create an app. This isn’t our app that we are going to write in Python. This is an app with in the Twitter API. So, each app you write that interfaces with Twitter requires an app here.
Next, we have to set up a dev environment. We are going to be looking for Tweets that are in the last 30 days. Here you can create your dev environment, but you need to do it after you created your app.
App
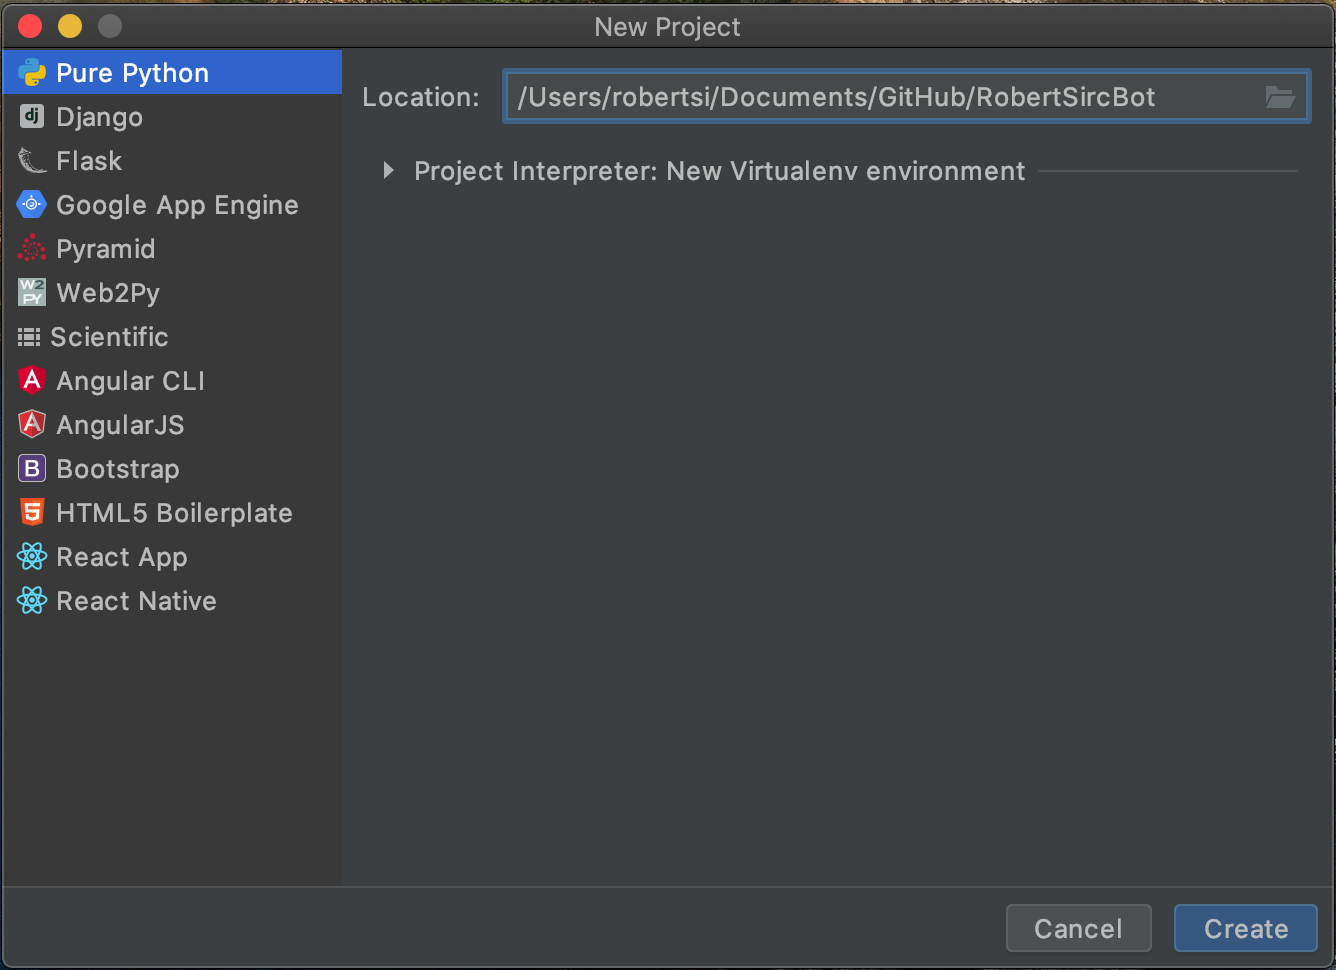
OK, I use PyCharm as my IDE of choice when it comes to writing Python. This has a free community edition here. Or you can buy the professional version. I use the professional version. There is nothing we are going to do with this app that requires you to need it. If you don’t want to use PyCharm you can set up Visual Studio Code. What I am not going to go deeper in to is how to install Python. There are instructions on Python.org here that goes in to how to set up how to get started. I personally got started with Python with Pluralsight. And there was instructions there. Again way too many places to get it no reason for me to do it again here. Next full on disclaimer. As I mentioned in my previous post Why Py I am no expert on Python. I have met quite a few Python developers who will never claim this, but have been doing Python for many years. My code will not be fully pythonic, as this is coding this will eventually get to that way. So when you are doing this exercise yourself know it will work but it wont be fully pythonic.
So, let’s create the project. I am calling mine RobertSircBot. That was the name I gave it for Twitter in their dev portal. It’s also the name I called it in GitHub. Should look something like below.
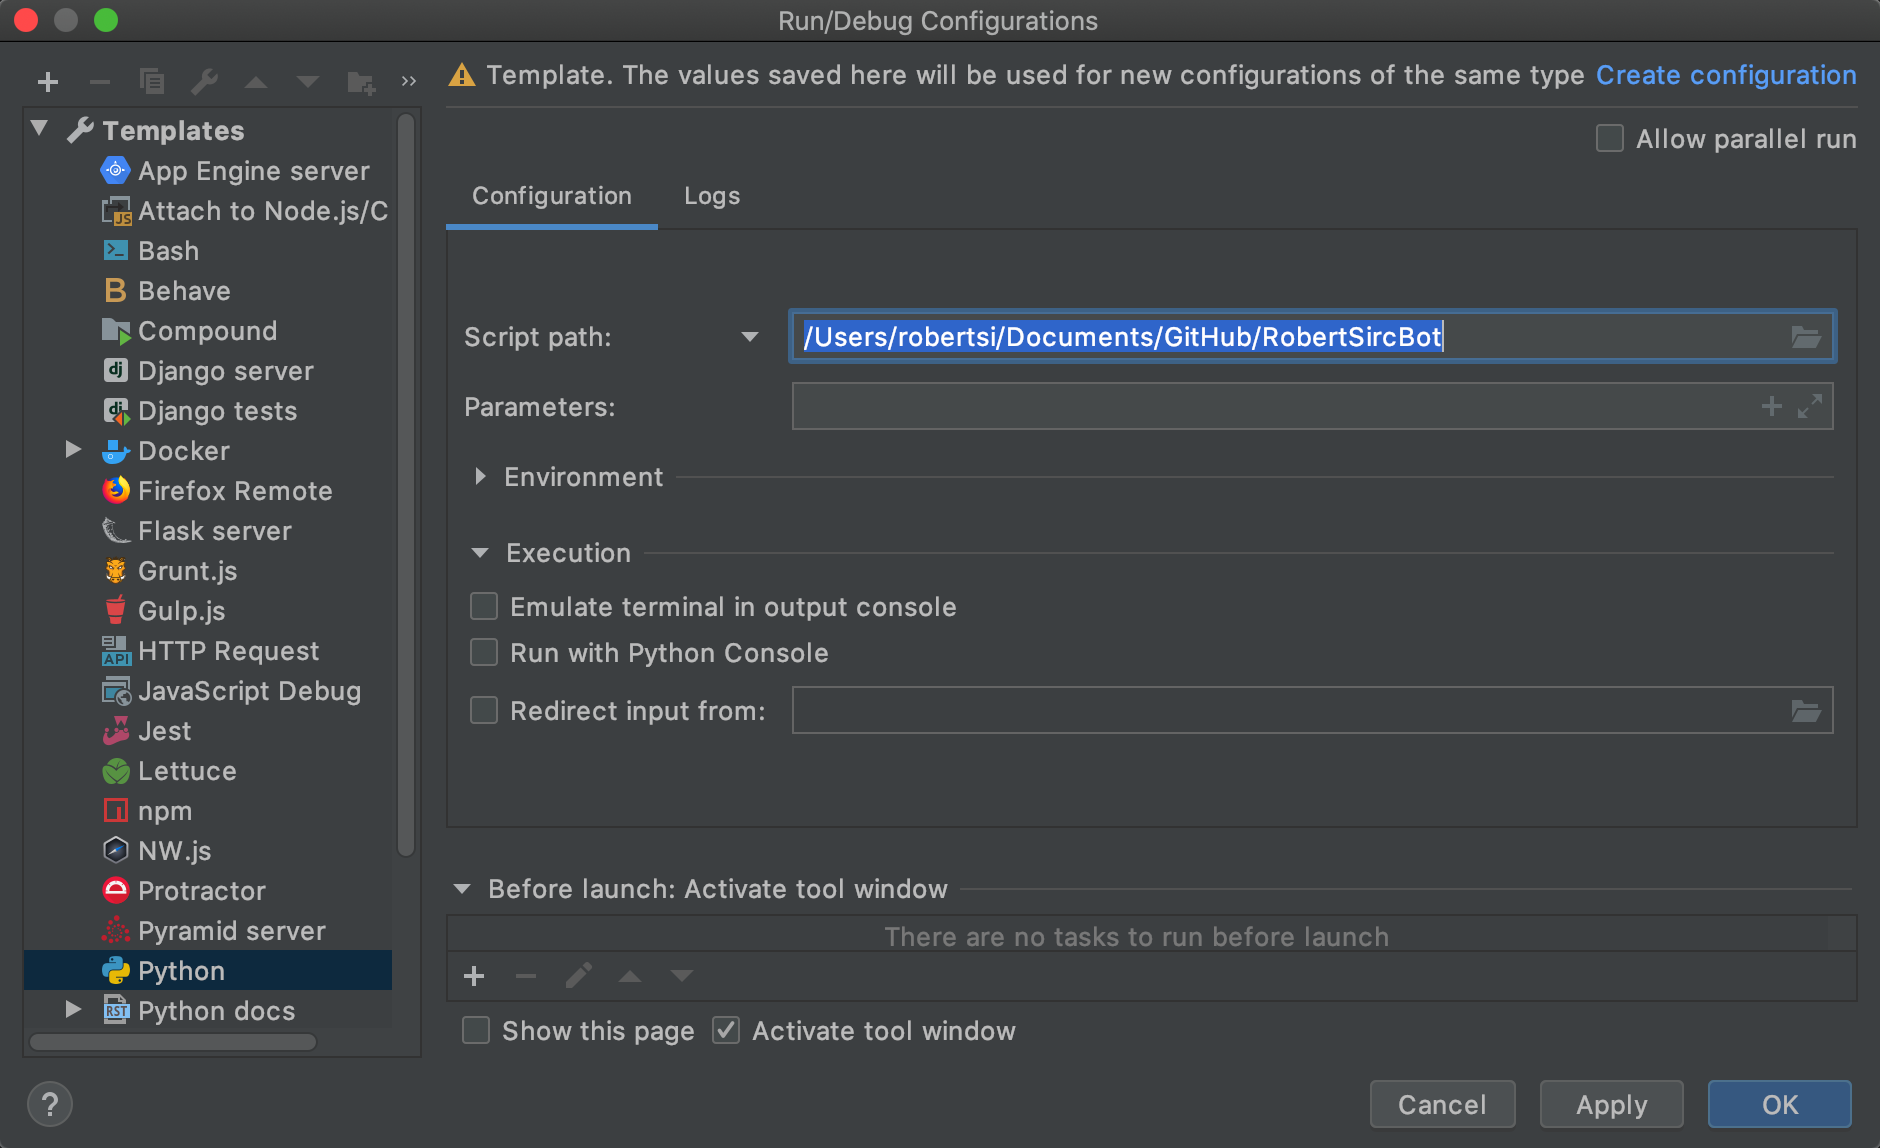
We need to create a configuration for how we want to run this within PyCharm. If you are not using PyCharm then you can skip this part. At the top of the IDE there is a button that is called Add Configuration. What you see is below. Select Python from the templates and set the Script path to the home directory of your app, for me it is /Users/robertsi/Documents/GitHub/RobertSircBot.
There is a button on this screen called Create configuration select that then hit Ok. This set’s up our configuration so we can run and debug with one click.
Start
Let’s next create a file called bot.py. This is where we will store our main function. So let’s add that in now in bot.py:
import sys


def main():
    print('start')


if __name__ == '__main__':
    main()
So I added two things first was import sys this just imports the sys module to give us the print function so we can print out information. If we run this it’s going to break. We need to go back to our configuration and set our Script path to select the bot.py file, for me it looks like this /Users/robertsi/Documents/GitHub/RobertSircBot/bot.py. If you run the app again you will get below as an output:
startTweepy is the next thing we need to do. Tweepy is an open source Python library for using the Twitter API. If you are using PyCharm you can add the following line:
import tweepyYou will get a red light bulb that will hover over this if you select it the drop down will give you a button to install this library.
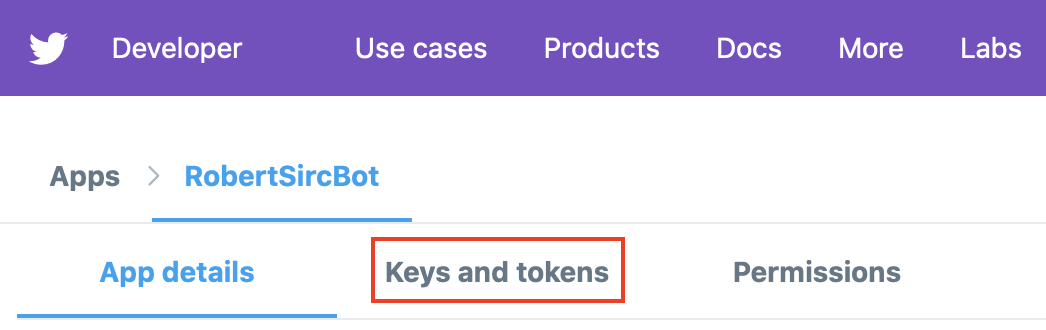
The Twitter API has a few values we need to pass to it in order for us to interact with the API. You can find these values under the tab called Keys and tokens on developer.twitter.com. But before we go too deep with that let’s be clear these tokens can give access to your account via the API. DON’T CHECK THIS IN TO SOURCE CONTROL AND PROTECT THEM LIKE THEY ARE YOUR DAMN PASSWORD!
Before we generate access token and access token secret let’s create a file to store these values in. Now I get it this isn’t a cloud-native practice but we are striving for an MVP here we will be cleaning this up later in this post or on a subsequent post. So the file we are going to create is called configuration.py. This file will have the following values:
CONSUMER_API_KEY = ''
CONSUMER_API_SECRET_KEY = ''

ACCESS_TOKEN = ''
ACCESS_TOKEN_SECRET = ''
All four of these values will come from developer.twitter.com under the Keys and tokens you will need to generate the Access Token and Access Token Secret.
Let’s take a moment to see what we have so far:
- We created a new project
- Created our main file
- Setup our configuration
- Installed a library for the Twitter API
- Created access tokens and stored them in our project
Now we can really get started coding, in our workflow above we just finished up Start. Basically getting the core items of this project flushed out.
Pull the latest post
Now we want to pull the latest post from our site. We can do this all in one file or we can move it to another. To keep things clean we are going to have a file for what we do for web and what we do for Twitter. So add a file and call it posts.py. So we need to look at the best way to get my latest post, for your set up it will be different. Each blog and site is structured differently. I looked at my post directory at the index.xml https://sirchia.cloud/posts/index.xml. That structured looked like this:
<item>
<title>Culture of Modernization</title>
<link>https://sirchia.cloud/posts/culture-of-modernization/</link>
<pubDate>Mon, 16 Mar 2020 00:00:00 +0000</pubDate>
<guid>https://sirchia.cloud/posts/culture-of-modernization/</guid>
<description>So, the cloud movement has been in full swing for a few solid years now. Companies are leveraging the big three public clouds. With that they are looking at private and hybrid solutions as well. One of the sticking points for moving to the cloud has been modernization. Unless you are picking up your VM&rsquo;s and moving them as is to the cloud, you are going to have to modernize to some degree.</description>
</item>The three major elements we need are title, link, and pubDate. Since the latest version of Python is 3.8, and I am doing this write up in 3.7, I want to use the new DataClass annotation this might be overkill but we can use it here. So in the posts.py file add the following:
from dataclasses import dataclass

@dataclass
class BlogPost:
    title: str
    link: str
    date: str
This will give us a easy response object. Now we need to write a method that gets all of our post. But before that let’s take a moment and add in my url to our configuration.py like below:
URL = 'https://sirchia.cloud/posts/index.xml'We are going to need this later and I want one place in our code to reference this. Back to a method to get all post we are going to add the following to our posts.py file:
from configuration import *
import requests


def get_all_post():
    response = requests.get(URL)
    return response.content.decode('utf-8')
We are adding in a reference to our configuration.py file, we are going to need this for our URL. We also added a reference to the request library we need this to make our web request. Next we added a new method called get_all_post. The post.py file should look something like this:
from dataclasses import dataclass
from configuration import *
import requests


@dataclass
class BlogPost:
    title: str
    link: str
    date: str


def get_all_post():
    response = requests.get(URL)
    return response.content.decode('utf-8')
So far we can get all of our blog post if we make this request. But now we should write up a method to get a blog post by a specific date, we can call it get_post_by_date or something similar. But we need to look at the date we have in our xml from our site:
<pubDate>Mon, 16 Mar 2020 00:00:00 +0000</pubDate>This date format is awful but we are going to need to format it if we want to compare it to a date we are going to pass in. For my date string above my ISO format looks like this %a, %d %b %Y %H:%M:%S %z. And we should add that to our configuration.py.
URL = 'https://sirchia.cloud/posts/index.xml'
DATE_FORMAT = '%a, %d %b %Y %H:%M:%S %z'
The post.py file should look something like this below:
import xml.etree.ElementTree
import datetime
from dataclasses import dataclass
from configuration import URL, DATE_FORMAT
import requests


@dataclass
class BlogPost:
    title: str
    link: str
    date: str


def get_all_post():
    response = requests.get(URL)
    return response.content.decode('utf-8')


def get_post_by_date(date):
    response = get_all_post()
    tree = xml.etree.ElementTree.fromstring(response)
    for item in tree.iter('item'):
        if date == datetime.datetime.strptime(item[2].text, DATE_FORMAT).date():
            return BlogPost(item[0].text, item[1].text, item[2].text)
    return BlogPost('', '', '')
OK, there is a lot going on here but what we did is add in the method get_post_by_date which will get a post by a specific date that is passed in. Now it will only return ONE post and for me that is fine. I have kids and a day job so I never have more than one post a day. When it doesn’t find a blog post it just returns an empty BlogPost object. Since we are planning on this guy running once a day let’s create a method that goes in and selects the blog post for today:
def get_todays_post():
    current_date = datetime.datetime.today().date()
    return get_post_by_date(current_date)
This could of been added to the get_post_by_date method but I might want to use this to do other things later so I wanted to keep it separated. So let’s recap we have a new file called posts.py that handles us getting a single blog post.
Pull the latest Tweets
This section will be dedicated to just the Twitter API. If we called the section that handles our blog post posts.py this one I think we can call tweets.py, so we can add that one in now. Now the Twitter API has a lot of these methods but I want to add a wrapper just incase we need to change libraries in the future. So, we are going to add a new method called see_if_tweet_exist() but to do that we need to add in some essentials.
import tweepy
from configuration import CONSUMER_API_KEY, CONSUMER_API_SECRET_KEY, ACCESS_TOKEN, ACCESS_TOKEN_SECRET

auth = tweepy.OAuthHandler(CONSUMER_API_KEY, CONSUMER_API_SECRET_KEY)
auth.set_access_token(ACCESS_TOKEN, ACCESS_TOKEN_SECRET)
api = tweepy.API(auth, parser=tweepy.parsers.JSONParser())
What we just put in is a few things to help us use the tweepy library. Below is what see_if_tweet_exist() should look like. Of the code this is the method I dislike the most and will refactor as soon as I can.
def see_if_tweet_exist(post_url):
    tweets = api.user_timeline()
    for tweet in tweets:
        if tweet['entities']['urls']:
            urls = tweet['entities']['urls']
            for url in urls:
                if url['expanded_url'] == post_url:
                    return True
    return False
Job here is simple check my last 20 status updates and see if I have posted this URL before. Now the reason I am going on URL and not the whole tweet is simple. If I didn’t want to wait on the bot and I just posed this right away I don’t want the bot to do it again. One thing you will notice is having to drill down to the expanded_url property. That is because twitter likes to shorten URL’s.
Let’s add in sending a tweet out if it isn’t found. We broke this up in to two methods they could have been one and I might refactor this later.
def tweet_latest_post(post):
    api.update_status(build_tweet(post))


def build_tweet(post):
    return 'Latest write up: ' + post.title + ' ' + post.link
This pretty much sums up what we have for the tweets.py file. Three methods and a few imports to help us check and see if our tweet exist and send a tweet if we need to.
Pulling it all together
So if we go back to bot.py we have our main(): method we need to fill it out with the following:
def main():
    post = get_todays_post()
    if post.link:
        if not see_if_tweet_exist(post.link):
            tweet_latest_post(post)
This is some simple logic, get today’s post if there is a new post check and see if the tweet exist if it doesn’t tweet it. if we go through our check list from above:
StartPull the latest postPull the latest TweetsCompareBuild TweetPost Tweet
We accomplished what we set out to do. This took me less than an hour to code up. Took me five times as long to write up with post. Some final thoughts. First there is NO test and this is essentially bad admitting this now and this is a goal to on my next round of updates. Next it could be more pythonic, I broke out some methods way too far and I could have kept them together. Oh and I forgot a way to do some logging, but I think I need to figure out where I am going to run this app first. The overall goal was to give a great use case to write an app and do it in Python. Help demystify the language.
Next steps do some code clean up! Add in some unit test. Lastly figure out a place to run this app. Thinking about running this in a Microk8s running on a Raspberry Pi with a 64-bit OS. I keep my work in this GitHub repo.